Local recording and file transcription do not need sign-in. Sign in when you want AI actions, account credits, or cloud records. Guest history and each account's history are stored separately on this device; switching identities does not merge them.
Sign-in and sessions
Where and what you need: Account at the bottom left of the main window. Sign-in needs internet; the menu shows only methods currently available.
Sign in with Google
- Open Account and choose Sign in with Google.
- In the system browser, select the Google account you want and complete the requested sign-in and confirmation.
- Return to VokeLine as prompted and wait for account information to load.
- Check the name, account, and available credits before running AI or managing cloud records.
What happens: Your signed-in account appears in the desktop app. If you cancel, the browser cannot open, or the network drops, check the Account message and retry. Avoid starting parallel sign-ins for different accounts.
Sign in with email and password
- Open Account and choose Sign in with email.
- Enter an existing account's email and password and submit.
- Wait for completion and check which account is now active.
What happens: You can use that account's credits and cloud records. Email sign-in is for existing accounts: typing a new address does not register one. If a method is missing, use an available option or contact support.
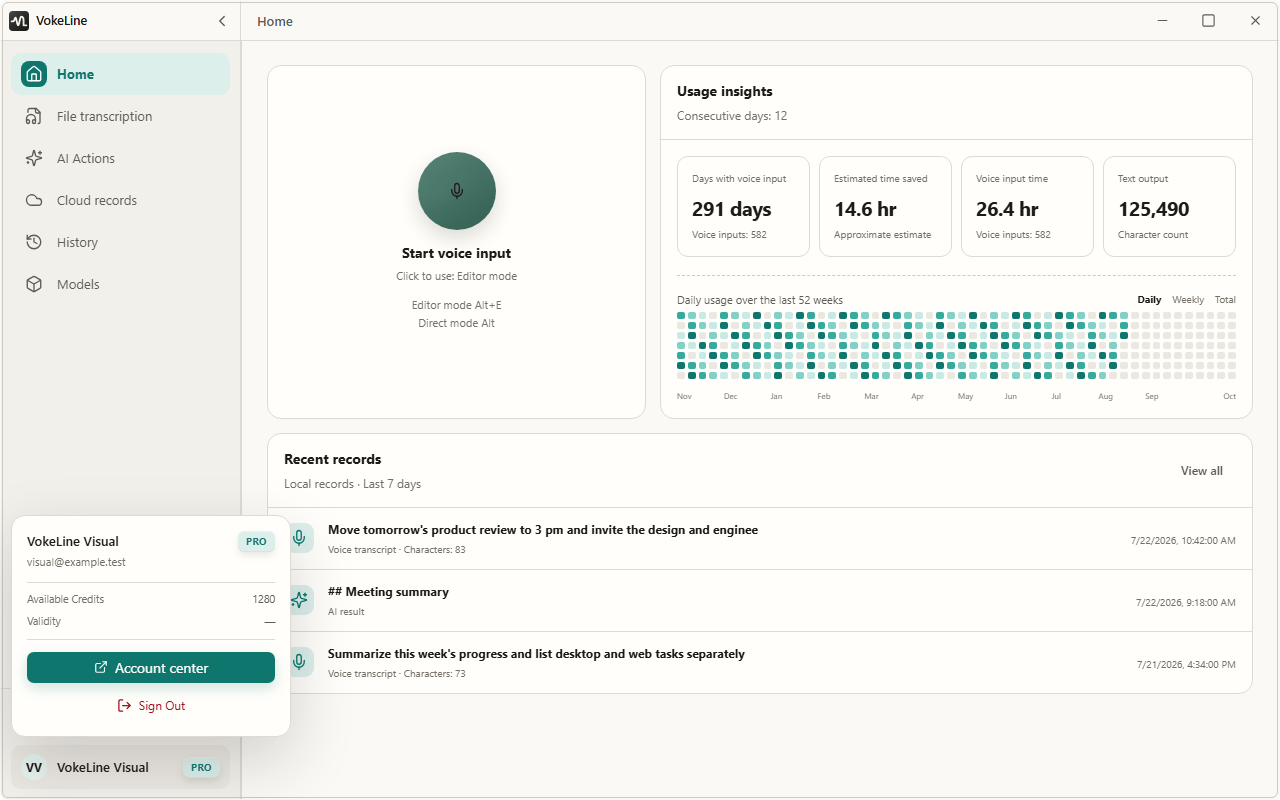
Available Credits shows your balance, Account center opens the website, and Sign Out ends the current sign-in.
Session replacement and sign-out
An account has one active desktop session. Signing in to that account on another client replaces the previous session. The previous client may report that the account signed in elsewhere and its session ended. Signing back in on the first client replaces the other client's session in turn.
To sign out, choose Sign Out from Account and wait for the signed-out state. Models and saved records are not deleted. Local history switches to the guest identity; sign back in to the original account to see its local records again.
If restoring sign-in is in progress, wait. If restoration fails, use Retry in Account; if the session has expired, sign in again. Signing out does not clean up records—deletion has separate controls.
Subscriptions and credits
Where to start: Open the “Account” menu and choose “Account center” to open your account on the website. See Pricing for current plans, credits, and purchase options.
- Check that the website and desktop app are signed in to the same account, then open “Plans & subscriptions”, “Payment history”, and “Credit activity”.
- Select a subscription or credit pack if needed. Check the amount, credit release schedule, expiry, and checkout details before paying.
- After returning, wait for the status to update and check the subscription or credit history. A return from checkout or a bank preauthorization alone does not confirm an active order.
- Open Account again in the desktop app to check the latest available credits. Refresh the account information or reenter the app if it has not updated.
What happens: Issued credits that remain usable can fund AI text actions. Local transcription, web search, and cloud-record management themselves do not spend AI credits. Check the current model and credit conditions before an AI action.
Prices, available purchases, and benefits can change; use Pricing, your account, and checkout for current information. See the Terms of Service and Refund and Cancellation Policy for release, expiry, and refund rules. Canceling a subscription is not a refund request and does not automatically refund it.
Local history and usage statistics
Where and what you need: History in the sidebar; Recent records on Home also opens entries. You see only the current guest or account's records on this device. Viewing local content does not need internet.
- Find an entry with All, Voice, or AI filters and select it for details.
- View the original for voice records, or the original and output for AI records. Copy the part you need.
- Load more to find older entries. If reading fails, use Retry rather than immediately clearing data.
- To delete one local entry, use its local deletion control, check the confirmation, and delete it.
On a narrow desktop window, selecting an entry opens its details. Use Back to return to the list; wide windows show the list and details together.
What happens: Copying gives you the record content you choose. A deleted local entry cannot be recovered, but its saved cloud copy and other identities' data are not removed.
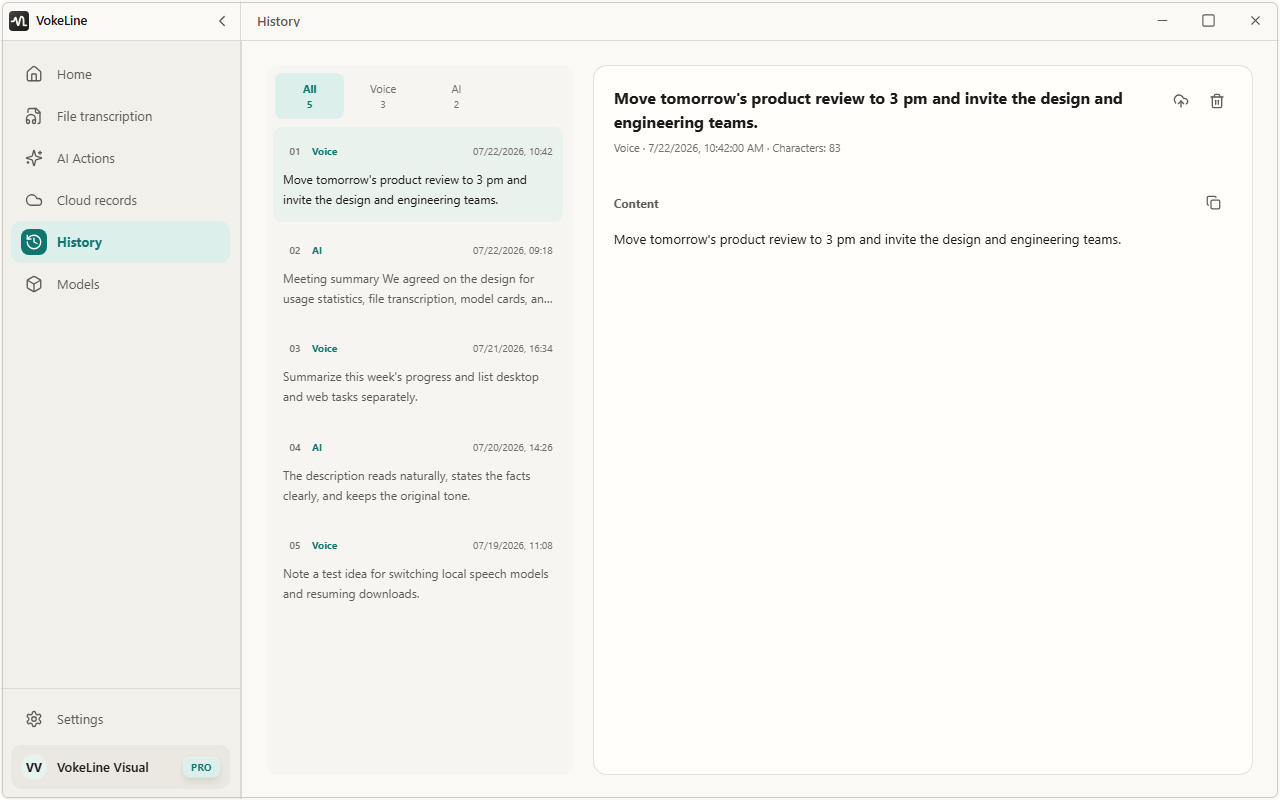
Turning off “Save local records” in Settings → Data and privacy stops saving new text records; existing entries remain. Home still records statistics for recordings and file transcription: session count, audio duration, and output characters. These statistics contain no transcript text.
This switch controls new entries on the History page. File-transcription tasks and their results are stored separately on this device. Use “Remove task” on the File transcription page when you no longer need a task; removing it does not delete a transcript already saved in History or the cloud.
The guest, account A, and account B have separate local history. A changed list after sign-in is an identity switch, not deletion of guest history. Signing in on another device does not bring this device's local history with you.
Save to the cloud
Where and what you need: Sign in, then choose History → an entry → Save to cloud. You need internet and room within the current cloud-record limit.
- Sign in to the account that should own the record, then open that account's local history.
- Select an entry, check the original or AI output for content you do not want uploaded, and choose Save to cloud.
- Wait for a saved or already-exists message. If it fails, retain the local original, check the network and limit, and retry.
- Open Cloud records, refresh, and check the saved content.
What happens: The record content becomes that account's cloud record, viewable on other devices signed in to the same account. The local original remains; deleting it later does not delete the cloud copy.
Signing in does not automatically turn guest records into that account’s local history. View or copy guest content while using the guest identity. Save to cloud operates on local entries accessible to the current account.
Manage cloud records
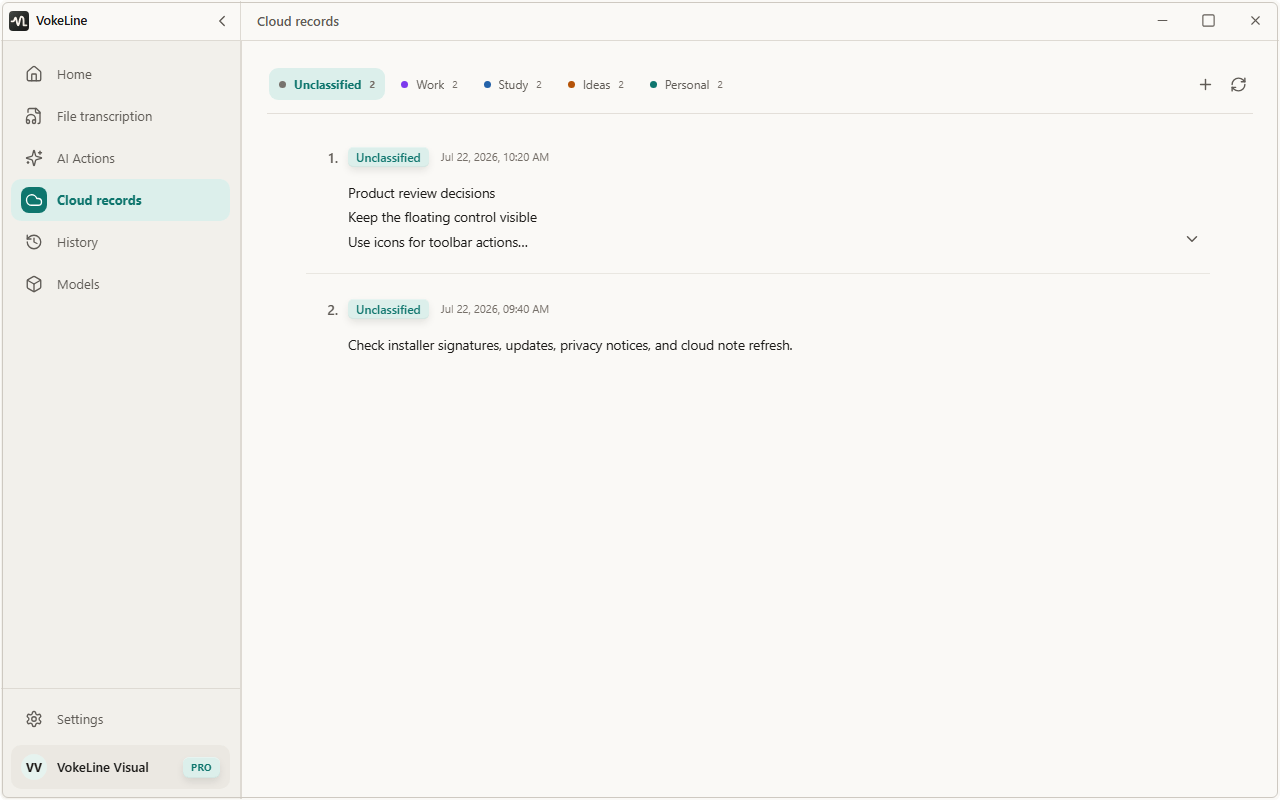
Where and what you need: Cloud records in the sidebar. Sign-in is required. Fetching new content, editing, tagging, and deletion need internet. Already loaded content stays viewable offline; refresh manually after reconnecting.
View and edit
- Choose Unclassified or a tag and find an entry. Use Load more for further entries.
- Expand or select the record to view and copy its text.
- Select Edit record, change its title, content, or tag within the displayed limits, and save.
- Wait for the saved message before leaving. If another device has updated the record, retain your draft, compare the latest content, and decide what to save.
What happens: The cloud entry shows the saved changes. They do not automatically edit the local original. Keep working on an unsaved draft or explicitly discard it.
Tags and categories
- Choose New tag and enter a name. It must be non-empty, within the current length limit, and not a reserved name.
- Use Change tag on a record to assign its category. Editing also lets you create a new tag and apply it immediately.
- Select a tag to filter the list. If another device deleted it, refresh and choose again.
What happens: Records are organized under their current tags. Unclassified holds entries without a tag; changing the filter does not delete records.
Delete a cloud record
Choose Delete record, check the title, and confirm deletion. It cannot be undone, but the local history remains. To remove data only from this device, use the local cleanup controls below.
Delete or stop saving records
| Action | What it affects | What it leaves alone |
|---|---|---|
| Turn off Save local records | Stops adding new local-history entries; usage statistics continue. | Existing local and saved cloud records. |
| Delete one local record | The selected entry for the current identity on this device. | Cloud copies, other identities, and other devices. |
| Clear local records | The current guest or account’s local history, finished file-transcription tasks and results, and usage statistics on this device. | Cloud records, local models, and other accounts’ or the guest’s local records. |
| Delete one cloud record | The selected entry in the current account's cloud records. | Local history and other cloud records. |
Finish recording and wait for file transcription and AI processing to complete before clearing, so an active task does not save new records afterward.
To clear local data: Settings → Data and privacy → Clear local records. Check the current identity and copy anything you need first. Read the scope, confirm the clear operation, and wait for success.
What happens: That identity's records and usage statistics on this device are permanently deleted and cannot be restored. Switch to another identity before clearing its local data. Delete cloud records separately on the Cloud records page.
Data destinations and privacy
| Action | Where the content goes |
|---|---|
| Local recording or file transcription | Processed with a local model on this device; not automatically uploaded as a cloud record. |
| Save local records | Text stays on this device, with guest and account records kept separate. Local records have no additional encryption; protect your device and system account. |
| AI text actions | The text needed for this operation goes to the chosen online service. |
| Web search | The query goes to the chosen search engine. |
| Save to cloud | The record content is sent to the account's cloud records over the network. |
Check the content before choosing an online operation. Full data, service, and payment terms are in the Privacy Policy, Terms of Service, and Refund and Cancellation Policy. These remain separate legal documents; this guide explains the controls.